No products
 View larger


By buying this product you can collect up to 448 loyalty points. Your cart will total 448 loyalty points that can be converted into a voucher of 13,44 €.
Free carrying case with the purchase of a vaporizer
(While supplies last)
Tempest
269,00 € tax incl.
New product
tax incl.
MAD Heaters continues to revolutionize the world of mechanical vaporizers by presenting the very first portable mechanical ball vape, to enjoy the incredible flavors of your plants thanks to its high-level convection.
We've heard of thermal vaporizers, we've heard of ball vapes like Flowerpot or Vapothor: the British company has achieved a superb fusion of these vaporizers in a portable, lightweight model with exemplary finishes!
Availability:Product on restock, expect a 5 to 10-day delay. Your entire order will be shipped once this item is back in our stock. Add it to your wishlist to be notified when it returns.


")


Features :
- Mechanical ball vape vaporizer (mostly convection heating)
- Materials: grade 5 titanium, stainless steel, zirconia, and food-grade silicone
- Visual temperature indicator: 100 to 240 ℃
- Audible indicator (1st click at 200 ℃ and 2nd click at 220 ℃)
- Adjustable bowl: from approx. 0.075 to 0.15 g
- Adjustable air intake
- Airflow adjustable by six configurations (two tubes with three possible settings)
- Compatible with induction heaters, including the Wand
- Rotating mouthpiece (lockable) compatible with water filters featuring a Ø 10 mm ♀ female joint
- Measurements: 12.2 x Ø 1.4 cm for 36 g
To buy a Tempest is to receive:
- 1 x Tempest of MAD Heaters
- 1 x set of Ø 2.5mm zirconia balls (in the head)
- 1 x helix tube
- 1 x direct tube
- 1 x Secondary Cooling Unit (SCU) - helix intercooler
- 1 x Wand adapter
- 5 x bowl screens
- 1 x O-rings set:
- 3 x Ø 6 x 1mm
- 2 x Ø 5 x 1mm
- 1 x stirring tool
- 1 x leather case
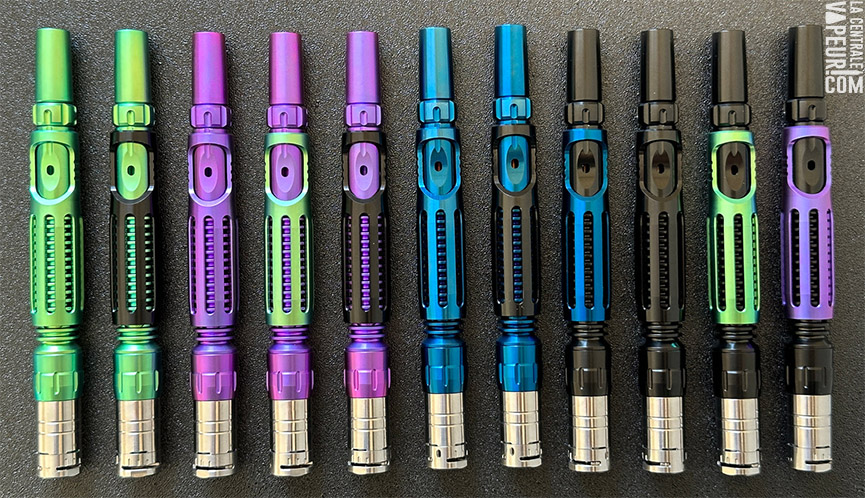
(Non-exhaustive) overview of possible Tempest color combinations (coming soon)
User manual:
Vaporizing with the Tempest:
- Unscrew the cap and fill the bowl by pushing it into your crushed plants, or by inhaling through the Tempest's mouthpiece (straw-style). Take care to keep the threads clean and preserve the airflow by not packing your plants too tightly.
- Gently screw on the cap until completely closed, and start heating with a Tempest double or triple lighter or a compatible induction heater (IH).
- If you're heating with a torch, be sure to keep the flame about 1 cm from the cap. Keep an eye on the visual indicator and gently turn the Tempest for even heating. The indicators react according to where you heat the cape, use the ring-shaped marking as a reference point, the default calibration is set between the two rings.
To preheat the bowl, heat slightly closer to it, but expect the indicators to react with a slight delay.
For a more pronounced flavor at the beginning of the session, heat on the other side and expect a faster reaction from the indicators.
If you are using an induction heater, use the Timer function or listen to the clicks. To change the heating location, adjust the insertion depth in your heater (see Using the Tempest with the Wand below). - Once the desired temperature has been reached, place your finger on the air release to manually regulate the airflow and inhale a large puff (or several smaller ones). Store the Tempest in a safe place, bearing in mind that the cap may retain heat for a few minutes.
Heating medium:
We recommend using a small double- or triple-flame Tempest lighter (with a large gas tank) or a compatible induction heater (such as the Wand).
Using the Tempest with the Wand:
After installing the adapter, gently press down on it with your Tempest until the top of the glass, marked by the arrow, is positioned between the area of the two red lines in the first image. We recommend adjusting it within the range marked on the cap in relation to the top of the glass to avoid heating too low or too high. Set it initially in the middle, as shown in the image.
Set the temperature to 300 ℃ (560 ℉) and leave it running until the "Time up" message appears.
For deeper roasting, increase the temperature setting in 10 ℃ (10 ℉) increments or gently press the adapter down 1 mm. For lighter roasting, decrease the temperature setting or adjust the adapter upwards.
By adjusting the adapter deeper, you can increase the conduction effect in the bowl, which is useful when extraction is uneven or the draft is slow to start. We recommend using the upper half of the two-line marking for indirect inhalation (MTL). If you adjust it higher so that the Wand glass is closer to the lower red line, it will be even more convection-focused, which can further enhance flavor, however this can result in uneven vaporization if the bowl is packed too tightly.
Note that changes in ambient temperature or wind can affect heading temperature. If there is a -10 ℃ difference in ambient temperature, consider increasing the Wand temperature setting by +15 ℃.
You can trim the silicone of the two-line adapter to better see the visual indicator from the bottom of the glass adapter.
Remove cap when warm and storage:
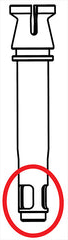
Use the leather case, the Reload magnet or the tool under its cover (Reload Gen 2 only) to secure the cap for removal. Tilt the cap rather than pull it out.
You can use the holster to store the Tempest if the cap is still warm.
Airflow settings :
In Open or Bypass mode, you can regulate the amount of fresh air entering the stem by adjusting the Airpath Control Dial. You can also modify the airflow by pressing the induction layer at a specific point and rotating the air holes in relation to the three visual indicators.
Rotating mouthpiece:
You can choose to block mouthpiece rotation (L) or not (S) by shifting the O-ring on the airflow tube.
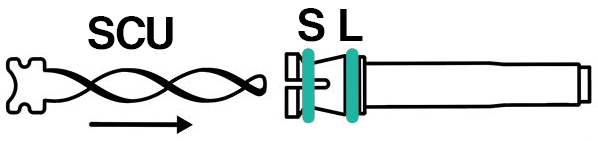
Secondary Cooling Unit (SCU):
To install the URS (helical intercooler) for further cooling, remove the O-ring from the "rotation" position (S), push the URS into the tube and then replace the O-ring to hold it in place. If you wish to install the URS while locking the mouthpiece rotation, use a second small O-ring (5 x 1 mm) in the "lock" position (L).
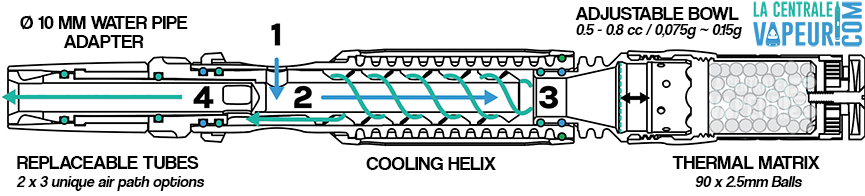
Tempest anatomy (numbers refer to airflow tube settings below)
Airflow tube options :
Helix tube - for cooling :
- Open: fresh air enters through the air intake (1) and travels to the center of the cooling unit (2) where it mixes with steam. The cooled steam then flows into the spiral (3) and finally reaches the mouthpiece (4).
- Bypass: air is directed directly to the mouthpiece (4) for a breath of fresh air, bypassing the cooling spiral (3) entirely. Meanwhile, steam passes through the cooling spiral (3).
- Closed: by closing the air intake (1), you remove fresh air for optimal MTL(mouth-to-lung) draft. Perfect for dense clouds with sufficient cooling thanks to the spiral (3).
Direct tube - for flavors and water filters:
- Direct open: fresh air is directed to the mouthpiece (4), adding freshness. Meanwhile, steam follows the central passage (2) and combines with fresh air (1).
- Direct bypass: fresh air is drawn in through the air intake (1) and directed towards the spiral (3), where it mixes with the steam. The cooled steam then flows to the Tempest's center (2) and mouthpiece (4).
- Direct closed: the air intake (1) is closed to extract a warm, full-flavored vapor flowing directly to the center (2) and mouthpiece (4). Ideal setting for an MTL draw or with a water filter.
Cleaning the Tempest:
Soak each part in a cleaning solution (such as isopropyl alcohol) for at least 1 hour using a zip-lock bag and shake periodically for thorough cleaning. Empty the solution, rinse the parts in hot water and allow them to dry completely before reassembling.
For a quick clean, moisten a paper towel with the cleaning solution and 'unscrew' the spiral. Use cotton buds to clean the remaining parts.
Hold the radiator handle by the air hole when removing the bowl. To clean the balls inside the cap after you've removed them, you can use washing-up liquid in a small shot glass or plastic tube, leave them overnight and shake them until they're clean. You can considerably improve the cleaning effect by heating the liquid (by placing it in boiling water, for example), in which case isopropyl alcohol may also work. Alternatively, place some of the balls on a spoon and heat them with a blowtorch until they are clean.
Do not soak the wooden sleeve (if you have one) in a cleaning agent. Clean only the inner metal lining with a cotton bud or pipe cleaner. At first, be sure to clean the tip side of the metal lining very carefully, where the grip lines/threads are located inside. Regularly apply a small amount of wax to the wood to prevent cracking and improve color.
☎️ For any questions before or after purchase, our team of enthusiasts is at your disposal on our vape hotline at +33 1 83 64 69 26 from 11 am to 7:30 pm from Monday to Friday, and from 12:30 pm to 7:30 pm on Saturday. You can also place an order directly over the phone if you wish.
If you want to buy a vaporizer in Paris, our vaporizer shop is 500 meters from the République metro station, at 16 boulevard de Magenta, 75010 Paris.

- For further information on the nature of the review controls, as well as the possibility of contacting the author of the review please consult our Transparency Charter.
- No inducements have been provided for these reviews
- Reviews are published and kept for a period of five years
- Reviews can not be modified: If a customer wishes to modify their review then they can do so by contacting Verified Reviews directly to remove the existing review and publish an amended one
- The reasons for deletion of reviews are available here.
- 1
 0
0 - 2 0
- 3 0
- 4 0
- 5 2
B A. published the 15/10/2024 following an order made on 28/09/2024
Everything perfect, repeating customer